


Wood burning, or pyrography, involves decorating wood using an electrically heated tool. You can burn designs onto many items, such as bowls, cutting boards, or other home decors. The one-of-a-kind art offers a unique way to decorate your home, giving it a rustic, vintage vibe.
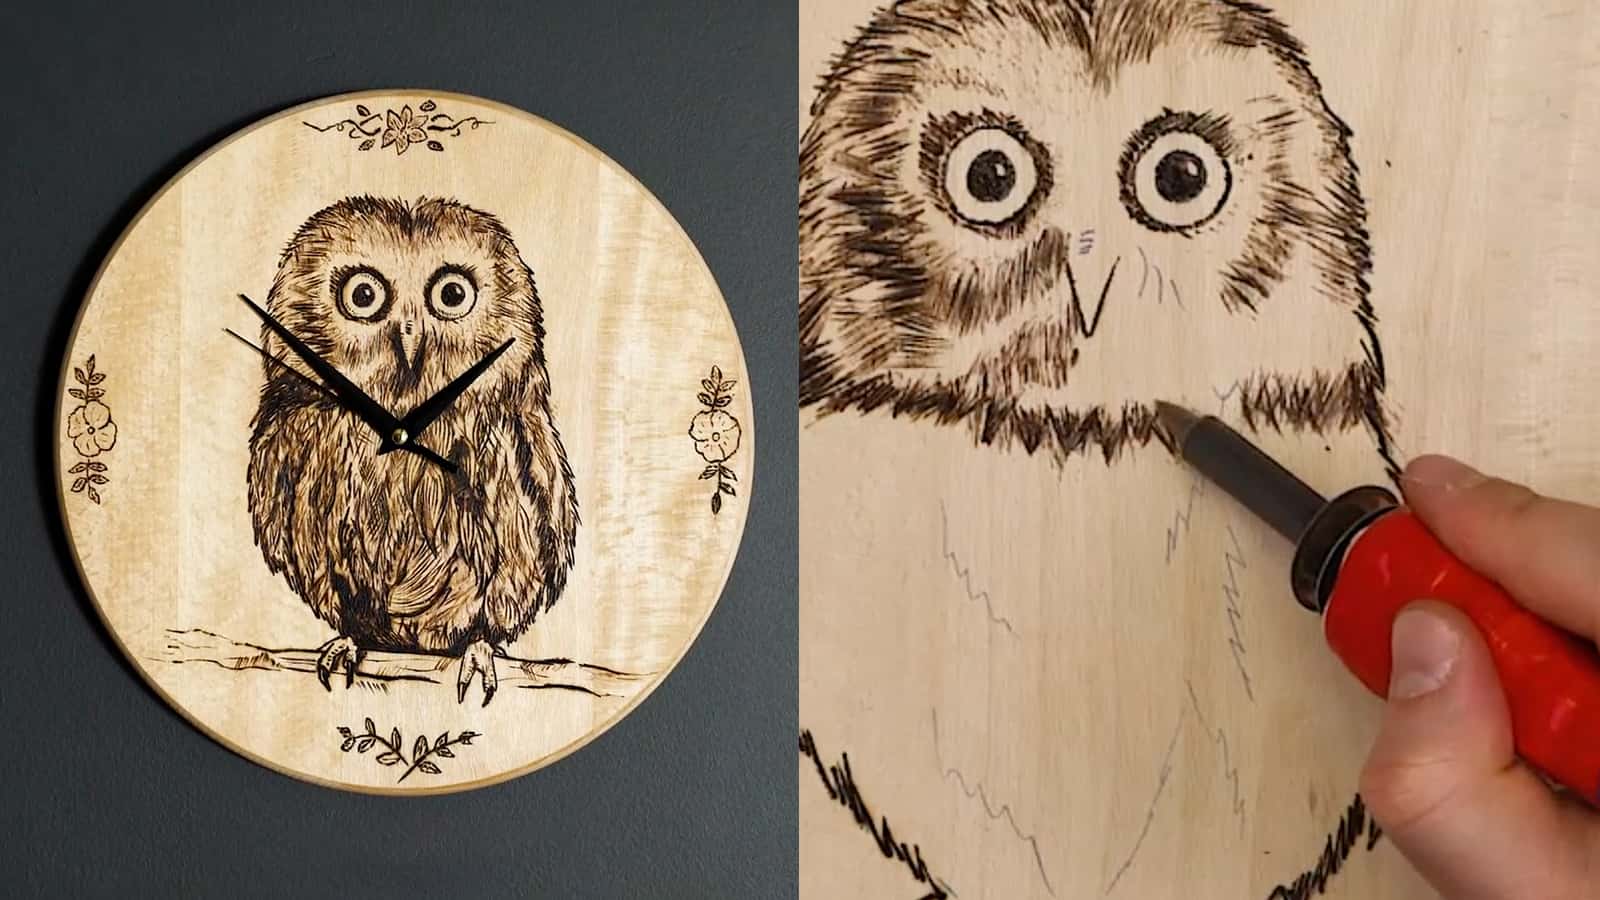
This wood burning clock with an owl as the backdrop makes telling time a bit more interesting. You will love this little project if you have a knack for making crafts, especially using wood. An artist will take you step-by-step through the process so you can make your very own wood burning clock.
How to make a beautiful, handmade wood burning clock
Here are instructions for starting your new hobby.
Tools and items you’ll need for wood burning:
- A round, smooth piece of wood
- Indigo art paper
- Your wood burning design sketched on paper
- Masking tape
- Pencil
- Wood burning tool
- Wood oil
- Electric drill
- Clock mechanism
Directions:
- Get out your piece of wood and lay it flat on a table. Next, lay the indigo art paper in the middle.
- Place the sketch of your choice (in this case, an owl) on top of the indigo paper. Tape the sides to the wood to keep the paper centered and steady.
- Next, grab a pencil and start tracing the outline of the sketch. Press firmly on the paper to ensure the design transfers to the wood. Make sure to go over important details like the eyes, body, feet, and wings. (Or whatever design you choose).
- Then, remove the tape and pieces of paper. If you did it right, you’d see an image of your sketch on the wood.
- Now it’s time to burn the design onto the wood. Get out your wood-burning tool and start carefully tracing the design. Take your time on this step, as you can’t erase any mistakes.
- You may want to keep your sketch nearby to refer to during the wood burning process. After tracing the outline, start working on the smaller details like the feathers, shading, etc.
- Add a design of your choice on the clock to mark 12, 3, 6, and 9 o’clock. In this case, the artist chose to burn a simple flower and leaf design onto the wood.
- Next, pour a small amount of wood oil on top and use a brush to coat the clock evenly. Wood oil acts as a protective, water repellant, and decorative finish for wood. It enhances the natural look of wood and keeps it from drying out.
- Let the wood oil dry for a couple of hours.
- Once it’s dry, grab your electric drill and drill a small hole in the middle of the clock.
- Place the clock mechanism on the back, and put the hands in the front. You can find a clock mechanism for about $10 on Amazon or other major retailers.
Enjoy your beautiful wood-burning creation! As a side note, you can also burn numbers onto the clock, but it may take away from its beauty. At least you have the designs to help you keep time if adding numbers isn’t your thing.
Wood burning basics for beginners
Wood burning takes time and effort to perfect, but anyone can enjoy it. If you decide to partake in this art project, you’ll want to keep these pointers in mind.
- Feeling overwhelmed about buying all the supplies? No worries! You can always buy a wood-burning kit complete with everything you’ll need. This is perfect for beginners because the kits generally cost much less than serious wood burning tools. If you’re on the fence about exploring this hobby further, it’s best to start with basic supplies.
- Wondering where to buy wood? You can find it at your local hardware store or online. You’ll have several unfinished wood options to choose from, such as oak, pine, birch, and bamboo. Beginners should opt for smooth woods like birch, basswood, or bamboo. Uneven grains like pine and oak are typically used by more experienced artists.
- You can also draw your design onto the wood freehanded, but it’s easier to copy it. Make sure to remove any excess graphite from the wood before burning the design.
- If you’ve never used a wood-burning tool before, it resembles a pen that plugs into an electrical outlet to create heat. It comes with temperature control and interchangeable tips varying in size and shape. Be careful while using the tool since it can get scorching. Make sure to read any instructions before you begin.
- Allow the tool to heat up for 5 minutes before starting your project. Please don’t put too much pressure on the tip when using the tool, as this can damage it. Instead, hold the tip on the same spot until the burn creates the shade you want.
- Want to add color to your artwork? Consider using watercolor pencils, wood gel stains, oil pencils, or gel paints. Or, you can opt for wood paint, but beginners should stick with the other suggestions.
- If you have a rougher piece of wood, smooth it out once you’re finished using sandpaper. You can also use a cloth to remove any wood residue.
We hope you enjoyed learning about the fascinating world of wood burning! If you take it up as a hobby, there’s an endless list of items you can create. From kitchenware to clocks to wood furniture, wood burning turns ordinary objects into masterpieces.
Final thoughts on the most amazing wood burning clock
Woodburning, or pyrography, has existed essentially since humans have been on this planet. After we discovered fire and began crafting objects like spoons and bowls, wood burning was born. Blacksmiths discovered that the heated metal could burn designs into other surfaces, like wood, during medieval times. Today, artists all over the world use the technique to decorate everyday items.
Making art not only adds beauty to your environment, but it’s also therapeutic and relaxing to immerse yourself in creating something. If you’ve been feeling stressed lately, we hope this wood-burning project will provide a nice escape from reality. So, grab your tools and a comfy chair, and make something beautiful to ease your mind. And, don’t forget to share the finished product with us!